Purpose:To create a capture and hold script, wherein players and teams are rewarded for seizing bases, and receive points periodically for continuing to hold them.
Setting Up the Map
The first step is to create a map. For this example, we'll use the CTF_Balance_Of_Power map as a basis. Start by making a copy of the CTF_Balance_of_Power.cs and CTF_Balance_of_Power.mis files in your /Starsiege/Multiplayer folder, and naming them CandH_OneBase.cs and CandH_OneBase.mis.
Once that's done, start up the Mission Editor (see the first tutorial if you don't know how to do this). From the main menu, choose Multiplayer, and then Create Game. The Host Menu should come up -- under Mission, select CandH_OneBase. The rest of the options aren't too important, but under the Basic tab, you probably want to set "Allow Connections On" to just IPX, or set a password, so no one joins your map while you're editing it. Go ahead and create the server, and then join the game.
To move around in the mission editor, use the W and S keys to move forwards and backwards, the A and D keys to shift straight left and right, and the E and C keys to move up and down. Rotate the camera by holding down the right mouse button in the main screen and then scrolling around. If your view moves uncontrollably of its own accord, driving directly down into the ground, then your joystick is probably slightly off-center, moving the camera for you. You can unplug your joystick, but this causes problems for me under DirectX7.0a, in the form of severe lag spikes every 5-6 seconds until the game crashes. You can try to recenter your joystick, but some sticks (notably my Saitek Cyborg 3D) are very bad at holding a steady center calibration. This is one of the reasons I hate map editing, but never mind that.
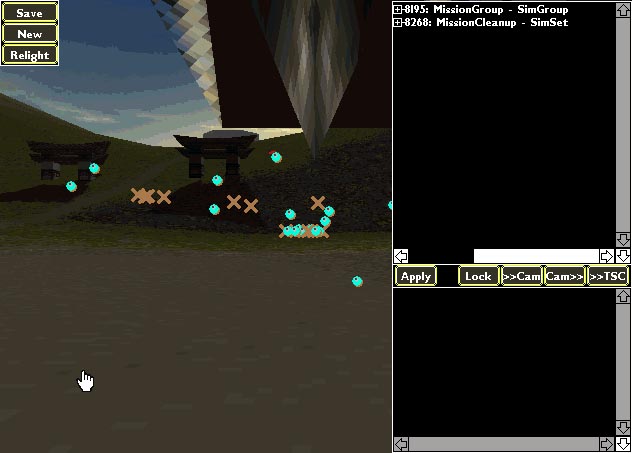
Anyhow, now that you have the map in the mission editor, then next task is to clear the extraneous objects. If it's not already present, bring up the object tree by pressing F2. It should look something like this:
Now click on the plus-box next to MissionGroup to expand that portion of the tree:
A few words on some of the branches in the object tree. The two main branches that you can see in the mission editor are MissionGroup and MissionCleanup. MissionGroup is the branch that contains all the objects that are automatically put on the map the first time it's loaded (i.e., all the buildings, triggers, drop points, etc., as well as some map data), while MissionCleanup mainly contains player vehicles, which are deleted whenever the map is reloaded.
All the interesting sub-branches are under MissionGroup. Volumes and world contain some important map information. Volumes deals with the texture maps and .ted.vol terrain files -- it's easy to crash the map by changing values here, so be careful. World is dangerous, too, but there are some values in there that let you change the sky texture, the visible distance, fog, gravity and other characteristics of the map.
The other useful object groups are the five DropPointGroups. DropPointGroup contains the drop points for deathmatch, with no teams, while the four numbered DropPointGroups contain the drop points for each team. For reference:
DropPointGroup1 = Yellow Team
DropPointGroup2 = Blue Team
DropPointGroup3 = Red Team
DropPointGroup4 = Purple Team
To create a drop point, you would click on the appropriate DropPointGroup in the object tree, press F3 to bring up the object selection list, choose Mission Logic, and then click on Drop Point. In point of fact, we'll just use the existing drop points for this tutorial, but all this is still good to know.
For our map, we'll clear away all the extraneous buildings and such, and create our own later. Start by clicking on Stuff in the object tree. The plus sign next to it indicates that it's a sim group, and that it currently contains objects, but if we click on its name, we'll select everything in it as well. With the Stuff group selected, press delete to wipe it out. Do the same for Triggers, BlueBase, PowerGenerators and purpleBase. You can hold down CTRL while clicking to select more than one group (or object) at a time, or use SHIFT to select a contiguous group, and then delete them all at once.
In the main window, scroll the map to the flat center space between the two bases -- this is where we'll put our Capture and Hold pad. Notice that the shadows from the deleted buildings are still present. Normally, you would click on Relight in the upper left corner to fix this, but this was broken in the 1.004 patch, and in any case, this would require players to download a new .ted.vol map file, so it's best just to live with the shadows.
In the object tree, click on MissionGroup. Press F3 to bring up the object selection list if it's not already up, and choose Mission Logic, and then Sim Group. A new object should appear in the object tree, with the name Group1 (or 2, or 3, etc., if you already created some). Press F2 to bring up the object attributes menu, which should consist of two properties, Object Name and Owns Objects (which should be checked). Change the Object Name to Alpha, and click on Apply so that the changes take effect (it's important to remember that changes don't take effect until you click Apply).
Point the camera at the center of the flat area. With the Alpha group highlighted in the object tree, bring the object selection list up again (F3), and under Mars Interior, choose Heal Pad. Left click on the object and drag it around a little -- besides providing an example of how to move objects around, this will also sink the pad object to ground level automatically. Hold down SHIFT while moving to rotate the object, and hold down CTRL while moving up and down to raise or lower the object. You can press O to toggle the options screen, to adjust which axis to rotate around, or to constrain one or more axis (to keep movement in a straight line), along with some other options. And in case you were wondering: there are temperate pad shapes that fit in less badly, but the Mars and Venus pads work a little better on uneven terrain, which helps grease the wheels later in this example.
In case the object didn't go into the Alpha group in the object list, you can highlight its name (hheal2ml by default), press CTRL-X to cut it, then highlight Alpha, and then press CTRL-V to paste it. CTRL-C and CTRL-V will also copy and paste, but the copied objects will lose their object names. Also, if you're having trouble with the keypresses, the cursor may have gotten locked into the Script Class box in the object attributes menu -- just click on another object in the object list and then click back on the pad object to fix this.
Now's also a good time to examine the object attributes in detail. Clicking on the Team box gives a choice of teams, although this has little effect on static buildings -- AI units will attack other teams' destructible buildings on their own, and the overhead map will show the building in their team color. When applied to turrets, however, the Team property is much more important. The script class is important for creating certain functions in a script that will apply only to that particular object (for static buildings, these are the OnAdd(), OnAttacked(), OnDestroyed(), onDisabled() and onScan() functions). Sensorable determines whether a building shows up on radar. The object name determines the name that shows up in the object tree. The next few properties are a mystery to me, so we'll skip down...
Position is the X Y Z coordinates of an object. Note that when you create an object, the default position is 0 0 0, so if you change some properties and then click Apply, the object will probably fly out of your camera view. It's a good idea to first click away from an object and then click on it again, so that the object position "takes." You can also click on the >>Cam button between the object tree and the object properties to zap the object to the camera position (Cam>> brings the camera to the object).
Rotation is a set of three numbers, one for each axis, in degrees. You'll usually change just the Z rotation value for objects on level ground, unless you're setting up ramps or some such. Indestructible is what it sounds like, and that's about as far as I know about the properties.
Anyhow, now that the pad object is in place, the next step is to create a trigger to go with it. First, take note of the position of the pad -- you can highlight it and press CTRL-C to copy it to the clipboard. Then click on the Alpha group again, bring up the object selection list, and under Mission Logic, choose Trigger (near the bottom, you may have to scroll down). Press F2 to bring up its properties, scroll down to Position, and put in the coordinates from the pad object, then click on Apply. You should see a small white box at the base of the pad object. This is much too small, so go down to the Dimensions object property for the trigger, and change it to 50 50 50, and click Apply. The box should now fill up the pad area, more or less. Finally, change the object name to AlphaTrigger, and change the script class to Capture (don't forget to click Apply afterwards).
And that's it for the mission editor, for now. Click on Save -- it won't look like anything's happened, and if you go back to the main menu and rejoin, you won't be able to see your changes -- you have to quit the game / editor after you save and restart Starsiege before they'll take effect. After clicking Save, you can quit by pressing ALT-F4. Another alternative is to press F5 to jump into the map as if you were playing and then quit normally (to get back to the mission editor, press ALT-F5).
It also occurs to me belatedly that you can press F9 to bring up a help screen, with the keypress commands -- I notice that I've given the wrong name to most of the menus and modes in the editor. Sigh, search and replace job for another night.
Scripting Up a Capture Pad
Open up the CandH_OneBase.cs file in your text editor. Since it's a copy of CTF_Balance_of_Power.cs, it should look like:
// FILENAME:	CTF_Balance_of_Power.cs
//
// AUTHORS:  	Chupie Doll & Youth in Asia
//------------------------------------------------------------------------------

$missionName = "CTF_Balance_Of_Power";

$maxFlagCount  = 8;           // no of flags required by a team to end the game
$flagValue     = 5;          // points your team gets for capturing
$carrierValue  = 2;          //  "      "    "    "    " killing carrier
$killPoints    = 1;
$deathPoints   = 1;
$flagTime = 240;

exec("multiplayerStdLib.cs");
exec("CTFstdLib.cs");

function setDefaultMissionOptions()
{
  $server::TeamPlay = true;
  $server::AllowDeathmatch = false;
  $server::AllowTeamPlay = true;

  // what can the client choose for a team
  $server::AllowTeamRed = false;
  $server::AllowTeamBlue = true;
  $server::AllowTeamYellow = false;
  $server::AllowTeamPurple = true;

  // what can the server admin choose for available teams
  $server::disableTeamRed = true;
  $server::disableTeamBlue = false;
  $server::disableTeamYellow = true;
  $server::disableTeamPurple = false;
}

function onMissionLoad()
{
   logStandardMissionStart();

   cdAudioCycle("Cyberntx", "Cloudburst", "Terror");
}

function onMissionStart()
{
  initGlobalVars();

  temperateSounds();
}
We'll start off by deleting a lot of the unnecessary junk. Modify your .cs file so it just reads:
$missionName = "CandH_OneBase";

exec("multiplayerStdLib.cs");

function setDefaultMissionOptions()
{
  $server::TeamPlay = true;
  $server::AllowDeathmatch = false;
  $server::AllowTeamPlay = true;

  // what can the client choose for a team
  $server::AllowTeamRed = false;
  $server::AllowTeamBlue = true;
  $server::AllowTeamYellow = false;
  $server::AllowTeamPurple = true;

  // what can the server admin choose for available teams
  $server::disableTeamRed = true;
  $server::disableTeamBlue = false;
  $server::disableTeamYellow = true;
  $server::disableTeamPurple = false;
}

function onMissionLoad()
{
  cdAudioCycle("Cyberntx", "Cloudburst", "Terror");
}

function onMissionStart()
{
  temperateSounds();
}
The first line, $missionName = "CandH_OneBase", is mostly cosmetic. The next line includes the contents of multiplayer.cs in the script, which gives access to a wide range of useful functions like zen pads, among other things. setDefaultMissionOptions determines which teams and gameplay styles are allowed on a map -- these values will be overridden by anything in a dedicated server .cs file, however, so be sure to set them again if you set up a dedicated server. onMissionLoad() runs certain functions as soon as the mission starts, while onMissionStart doesn't trigger its functions to start until a player actually joins the map. A fairly clean start, all in all.
To start off creating a capturable pad, we need to create a function to go with the trigger created back in the mission editor. To do this, go to the bottom of the script, and put in
function Capture::Trigger::OnEnter(%pad, %vehicleID)
{
}
This lays the groundwork for a function that activates whenever a vehicle enters the trigger. The word function indicates that you're creating the function definition (as opposed to calling an existing one). Capture is the script class created in the mission editor; the two colons attach it to the Trigger class (others include Structure and Vehicle); and OnEnter is the function that automatically goes off as soon as a vehicle goes into the trigger area. The two associated arguments are %pad, which is the objectID of the trigger itself, and %vehicleID, the objectID of the vehicle entering the pad. You can actually name these variables almost anything you want -- Dynamix's own scripts use %this and %object, but I felt that %pad and %vehicleID would be clearer.
At this point, it's worth thinking through how we want the pad to work. To begin with, let's say a player walks into the trigger area, and if he stays there for ten seconds, he owns the pad. If he leaves early, the ten second countdown needs to be restarted, and if someone else walks in four seconds into the the ten second countdown, the first player's countdown takes over the pad first, and then the second player takes it over four seconds later. So...
The first thing to do is to create a countdown that can tell how long a player has been in the pad area. You can do this by first setting a flag on the vehicleID when it enters the pad, turning it off if the vehicle leaves, and then creating a second function that keeps track of how long a player is in the pad until either a) he leaves or b) the ten seconds are up.
function Capture::Trigger::OnEnter(%pad, %vehicleID)
{
  %vehicleID.inPad = 1;
}


function Capture::Trigger::OnLeave(%pad, %vehicleID)
{
  %vehicleID.inPad = 0;
}
So far so good. Now create the secondary function.
The first line checks to make sure that the vehicle is still actually in the pad, according to its inPad flag. If not, then it bails out of the function and stops counting. The second line adds one to the vehicle's padCounter value. In the next few lines, the function checks to see if this value is greater than or equal to 10; if so, then it runs a seizePad() function and stops counting. Otherwise, if the vehicle's padCounter is still lower than 10, it uses the schedule() function to run itself again in one second.
Note that the format to run a function in schedule is schedule("functionName();", 10);, which would run functionName() after ten seconds. If you want to include arguments or any other variables, however, you need to separate them out of the quotes, using the @ sign to combine the text in quotes and the variables not in quotes, as shown in the captureCheck() function above.
Now that captureCheck has been written, you need to make sure that there's a seizePad() function for it to use:
function seizePad(%pad, %vehicleID)
{
  say("everyone", 0, getHUDName(%vehicleID) @ " has seized the pad!");
}
and also go back and fix the OnEnter function so that it gets captureCheck() going: